
Re-Blog from Vertical Film Festival
TECHNIQUES FOR PLANNING, SHOOTING, EDITING & PLAYING VERTICAL VIDEO
Artists have always made vertical (tall- or portrait-format) artworks, so why not films & videos? Good filmmakers never accept “but that’s just how it’s done” as an excuse! In the past, a lot of problems derived from the way moving image apparatus was designed. But now, as digital cameras & editing systems become more flexible and mobile devices proliferate, those limitations are disappearing and new possibilities are opening up.
So, how to make a vertical video? Read on…
TRIPODS, CAMERAS & MOUNTS

Almost every camera device these days can shoot high definition vertical video; it’s just a matter of turning it 90º and working out how to deal with the ergonomics.
If the camera screen or display can tilt, swivel and still be seen when the device is 90º, great, otherwise use it 270º and flip the image in editing if needs be. The smaller the camera, the tougher it is to keep steady while handheld though, so…
HOW DO I MOUNT A CAMERA SIDEWAYS ON A TRIPOD?
Fear not. Here are some ideas.
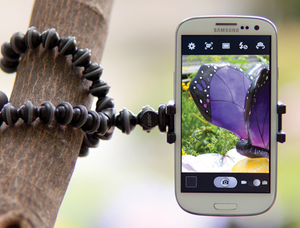
Plenty of manufacturers makemounts for mobile phone-cameras (above).
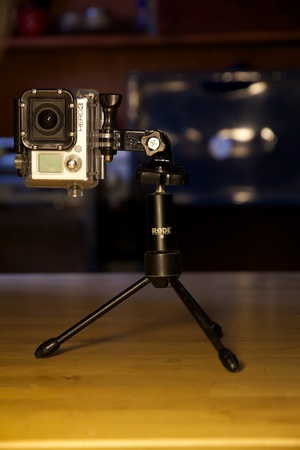
Some GoPro models (and their many competitors) come with simple 3-way pivot arms which allow you to angle them sideways.
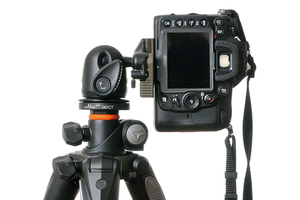
Most ball-head tripods (above) allow 90º tilt shots.
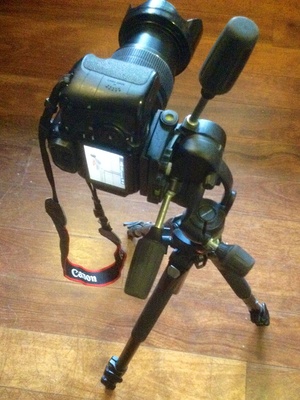
If you have a DSLR camera, you might use a 3-way tilt-head tripod, usually reserved for stills, and mount it on that. This enables rough tilt & pan as well.

If your tripod legs have a horizontal centre columnoption, that’s also an alternative, though somewhat cumbersome.

In each case, you might want to keep shots angled correctly by investing in a small spirit-level (for a couple of bucks on the internet) that slots into the hot shoe connector on your camera to show when it’s level.
None of these solutions is likely to give you smooth pans or tilts however. That may or may not be a problem depending on what you want to do.
For smooth tripod moves, or for cameras much heavier than a kilogram, you should be using a more solid tripod, ideally with a fluid head for gentle moves on both pan- & tilt-shots.
Therefore you might need an L-bracket Tripod Mount (also called an L-Plate) to go on top:
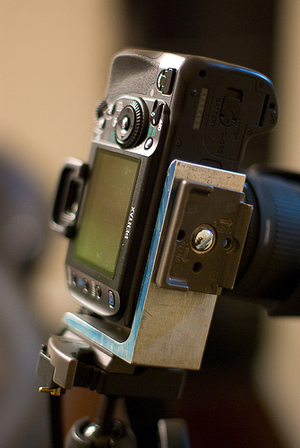
You can buy them or make your own with an L-bracket and buy the right screw for your camera baseplate from a hardware shop. Make sure your camera doesn’t pivot on the screw and fall forward under the weight of its lens though. Larger cameras may have a second hole in their baseplate for a registration pin which prevents this.
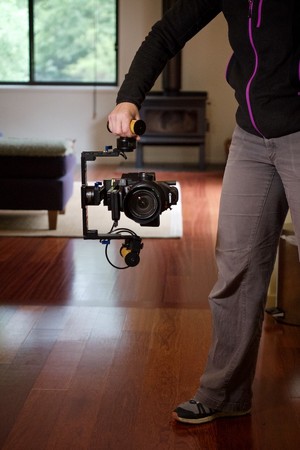
If you’re lucky enough to have access to a gimbal stabiliser such as a Movi or Letus Helix (above), you may be able to use the joystick control simply to rotate the camera 90º:
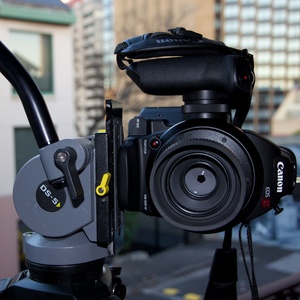
Above, the easiest solution for traditional fluid head tripods: try rotating the baseplate 90º on the bottom of your camera, mount it back on the tripod, tilt the head forward 90º and you might just have a workable solution without any extra gizmos. Make sure you counter-balance its tendency to fall, base-over-apex, so to speak! A good way to do this is to make sure one of the legs is always directly below the camera.
ALL TOO COMPLICATED?
GO HANDHELD.
Handheld camerawork is becoming more and more common in cinema, and not because Lars von Trier can’t afford a tripod. Beware that the narrower field of view of a 9:16 frame tends to exaggerate horizontal (left-right) movement, especially when projected large and tall, as in our Festival. Excessive camera wobbles — or even medium-fast pans — will amplify this effect and may make your audience ill! Lens image stabilisation may help if you have a lens with this feature, and applying an image stabiliser filter in editing may occasionally fix smaller wobbles — but do some tests of both with your camera and know the limitations of both methods. You can reduce the nauseating effects of constant movement by following some basic handheld camera stability techniques in this link.
LEFT OF FIELD OPTIONS!
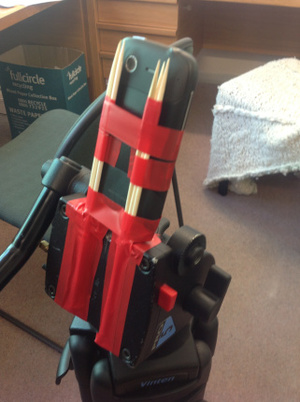
What about this, the ultimate cheap vertical filmmaking rig: kebab skewers and tape!
Do you have any experiences or other techniques to share? Please email us a photo and description and if we think it can help others we’ll include add it to the page!
ⓘ A little word of caution: always take great care when mounting cameras in ways that the manufacturers didn’t intend, as their centre of gravity will shift, potentially making it unbalanced, and placing unexpected strains on the bottom of the device.
Also, please note that these links are not to endorse any particular brand, model or retailer. There are many more out there easily uncovered by a quick web search.
SHOT COMPOSITION

Vertical video framing initially takes a bit of thought, but once you get the hang of it, your perspective on the world changes!
Look out for strong vertical features in the composition of the shot that can give reason for it to exist in the vertical format. People, buildings, trees, mountains, giraffes… 😉
The Rule of Thirds still often applies. If your shot has a strong horizon, consider moving it above or below the middle of the frame — unless 50/50 sky/land is your compositional strategy!
Pans or rapid action moving across the frame can be discombobulating for an audience due to the reduced field of view. But low and tall angles take on renewed power in the vertical format.
Remember that action-safe and title-safe areas still apply: keep important detail and especially text away from the frame edges lest it be cut off during stabilisation, projection or playback. Be aware that some 4:3 screen devices like iPads may crop top and bottom when showing the image full-screen.

SUBJECT MATTER

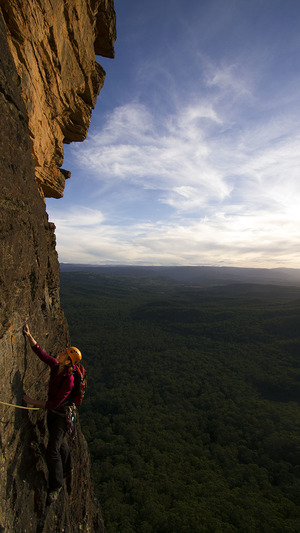
Our first edition was an umbrella event of the Australian Climbing Festival and so quite a few entries were climbing-related.
However there are plenty of other subjects out there that would benefit from a vertical perspective as well. The best advice might be to choose a subject — any subject — which 9:16 can explore from a whole new perspective…
EDITING

Exact workflow here will depend on your editing program. The general idea is to edit your footage how it was shot, ie. with it filling the screen. Whatever you do, don’t create an editing canvas with black side-bars as you’re losing resolution and making problems for later:

So:
1. Import and edit your footage as it is, at its highest resolution. If it’s sideways you may like to use a second display and turn it on its side to avoid cricks in your neck! Did you know that tablets can be used as secondary vertical displays for a computer?)
Many professional editing programs such as FinalCutPro X now cope with custom project sizes. In this case manually enter a 9:16 aspect ratio when creating a new project (eg. 1080×1920 or 720×1280 pixels) Adjust your clips in the browser if needed to give them a 90 or 270º rotation.
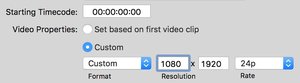
‘New Project’ settings in FCPX
2. Export with the recommended compression as Vimeo explain here, keeping your original dimensions and frame rate.
3. If you’ve been editing sideways you can now use the free, cross-platform MPEG Streamclip (see screenshot, right) to rotate the video 90º and re-save it (use SAVE AS, not export, else you will lose some video quality on the re-encode). This may also work with Quicktime 7 Pro for Mac or ffmpeg for Mac and PC. The procedure basically changes the ‘rotation’ flag on an MP4/H.264 video file withoutre-encoding. (Note that Quicktime, Vimeo & YouTube will take notice of this flag, but VLC playback may not.) All these options are a bit complicated and recommended only for adventurous types!
4. At this stage you can choose to upload it to the web. At the time of writing (Jan 2017) Vimeo, YouTube and Facebook all support and interpret 9:16 correctly BUT often play it back with side bars — especially on desktop devices — unless you embed them on a webpage with the correct dimensions as we do on this site. See below for more details. Vimeo, whilst not perfect, remains the main platform to enable maximum flexibility in aspect ratio experimentation which is why we use it for the Festival’s Selection Panel to view when we have an open call. Details about our upload and submission procedures are on our Submit Your Work page (you should read this next if you’re submitting a film to us).
ⓘ If you shoot on an smartphone or tablet, your footage may already appear rotated in your editing program as some devices automatically set the rotation flag to Portrait or Landscape based on an internal gyroscope, during shooting.
ⓘ Don’t want to buy an editing program? Check out Lightworks Free for Linux, Mac and Windows.

Above: Rotate your completed vertical video with the free MPEG Streamclip. Once rotated, SAVE AS to avoid recompression and consequent quality loss.
MUSIC

If you use existing, published music you will need permission in writing (a licence agreement) to do so. These can be very expensive unless you know the writers and performers personally!
Here’s a link to a brief explanation of music copyright for filmmakers.
You can buy tracks for video use from a site like AudioNetwork or Vimeo’s own Music Store, or you might dive into the sharing world via Creative Commons (CC). Here’s an explanation of how CC works, with site links, and here’s another listing of Creative Commons music sites such as SoundCloud. Better still, befriend a composer or some musicians who want to get their music out to the world!
WORKING VERTICALLY ONLINE

Two years back, 2015 marked the first dedicated vertical video app for mobile devices called Vervid. This was an exciting but sadly short-lived development.
We use Vimeo for judging previews and for exhibition of finalists because they’re one of the few sites that allow us to easily embed tall-format screen videos up the right way on the web without encountering the vertical filmmaker’s nemesis: pillar-boxing (black bars on the sides of the video). Bizarrely, pillar-boxing will appear on your video when viewed on Vimeo’s own page, and your icon may appear squished, but both problems disappear if you 1) embed the video on your own page or blog or social media channel and 2) upload a custom thumbnail via Vimeo’s settings for the video. Ignore Vimeo’s patronising warnings about your video being shot the wrong way!
Facebook used to cope with vertical videos, but now pillarboxes them again in many situations. It also comes with a whole swag of issues surrounding content ownership — plus their compression quality is often extremely poor.
YouTube, like Vimeo, will display videos with pillar-boxing on their site. The solution here (at the time of writing) is to editthe embed code when pasting it into a webpage, and change the dimensions to 9:16 (eg. replace <iframe width=”1280″ height=”960″ with the figures 540 and 960 respectively). It can take some fiddling to get it right. YouTube is slowly getting its act together for vertical filmmakers, especially for playback via its mobile app, so keep trying…
Hopefully these companies will wake up to themselves soon and realise that vertical video can be a valid aesthetic choice on the part of the filmmaker, and they therefore deserve a bit of dignity! 🙂
PROJECTION
If you’re using a video projector be aware that many will come with specific warnings against turning them on their side.
It’s not a conspiracy against vertical filmmakers, just lack of design forethought: hot air rises and needs to be able to escape through a vent.
(If you play back with the projector horizontal however, you will have the image confined to a low-resolution centre area with black side-bars.) So it’s best to find a projector that is designed for vertical mounting.
We don’t recommend using projector models that specifically caution against it — but if you do, at least take these few steps:
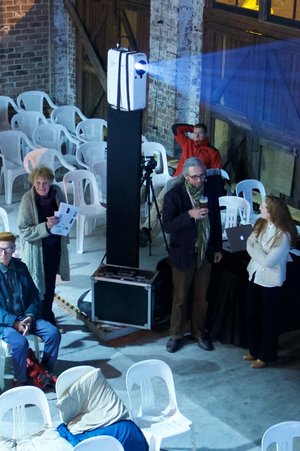
Projector set-up at the VFF 2nd edition.
1) Work out how the heat generated by the lamp will try to escape when mounted on its side and ensure that it can, else you’ll blow a very expensive bulb and may melt internal components or cause a fire!
2) Stabilise the projector vertically (we use a large stand and then tie-down lashing straps designed for for load restraint) while keeping the input ports accessible behind or on top.
3) In a hot environment you may want to point a fan at the unit as well!
4) Have all of your films ready to go as a VLC playlist on a laptop. Treat the projector as a second monitor, go to full screen playback on that screen, turn off OSD (on-screen display) in the preferences, hook up the sound, and you’re ready to go!
FINAL THOUGHTS…

All these tips have been about vertical vision, but that’s not to say good sound is any less important (“sound is fifty percent of the movie-going experience” according to a certain well-known Hollywood director). Recording good, clean sound on location may save you hours of anguish in the editing room and your audience will thank you for not having to listen to lens stabilisers clicking away.
And no, you probably shouldn’t rotate your stereo microphones 90º with the camera, otherwise left/right will become top/bottom while your playback speakers probably won’t be! Maybe Dolby will come out with 10.1 surround one day (woofer + 5 channels down low, and another 5 near the ceiling) but until then “vertical sound” must wait in the wings…
Lastly, like the early pioneers of expanded cinema, don’t be afraid to test out new ideas, make mistakes, find solutions, break rules, and push the vertical form’s potential. That’s precisely what we set up the Festival to do: to encourage artist-filmmakers to experiment. We can’t wait to see what you come up with!
Adam Sébire
Vertical Film Festival Co-Director
January 2017

Leave a comment